How to Repair PST and OST Outlook Data Files with Inbox Repair Tool (SCANPST.EXE).
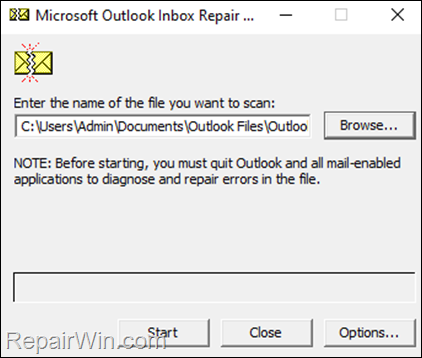
This tutorial contains instructions on how to repair a damaged Outlook .PST or .OST file with the Microsoft Outlook Inbox Repair Tool. The Inbox Repair Tool (also known as "SCANPST.EXE"), is a very useful utility provided by Microsoft to repair Outlook data file(s) and is available in all Outlook versions (from Outlook 2003 up to 2019) .
If Outlook crashes or if you face other problems with Microsoft Outlook (e.g. if Outlook freezes or not responding), then follow the instructions below to repair the outlook data files, with the Microsoft Outlook Inbox Repair tool.
How to Repair Outlook .PST or .OST data file with SCANPST (Outlook Repair Tool).
To repair your Outlook data file:
1. Close Outlook.
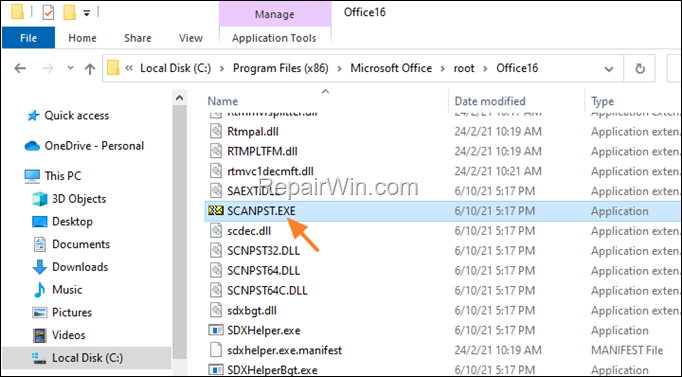
2. According your Windows architecture (32-bit or 64-bit) and Office Version, navigate to the mentioned location bellow and double click at "SCANPST.EXE" application.
Office 2019 & 2016 & Office 365:
Windows 32-bit > C:\Program Files\Microsoft Office\Office16
Windows 64-bit & Office 32-bit > C:\Program Files (x86)\Microsoft Office\Office16
Windows 64-bit & Office 64-bit > C:\Program Files\Microsoft Office\Office16
Click-to-Run Office 32-bit > C:\Program Files (x86)\Microsoft Office\root\Office16
Click-to-Run Office 64-bit > C:\Program Files\Microsoft Office 16\root\office16Office 2013:
Windows 32-bit > C:\Program Files\Microsoft Office\Office15
Windows 64-bit & Office 32-bit > C:\Program Files (x86)\Microsoft Office\Office15
Windows 64-bit & Office 64-bit > C:\Program Files\Microsoft Office\Office15
Click-to-Run Office 32-bit > C:\Program Files (x86)\Microsoft Office\root\Office15
Click-to-Run Office 64-bit > C:\Program Files\Microsoft Office 15\root\office15
Office 2010:
Windows 32-bit > C:\Program Files\Microsoft Office\Office14
Windows 64-bit & Office 32-bit > C:\Program Files (x86)\Microsoft Office\Office14
Windows 64-bit & Office 64-bit > C:\Program Files\Microsoft Office\Office14
Office 2007:
Windows 32-bit > C:\Program Files\Microsoft Office\Office12
Windows 64-bit > C:\Program Files (x86)\Microsoft Office\Office12Outlook 2003
32-bit Windows > C:\Program Files\Common Files\System\MSMAPI\<locale ID>
64-bit Windows > C:\Program Files (x86)\Common Files\System\MSMAPI\<locale ID>Outlook 2002/XP
C:\Program Files\Common Files\System\MAPI\<locale ID>\scanpst.exeOutlook 2000
C:\Program Files\Common Files\System\MAPI\<locale ID>\NT\scanpst.exe
3. Double-click to open the SCANPST.EXE
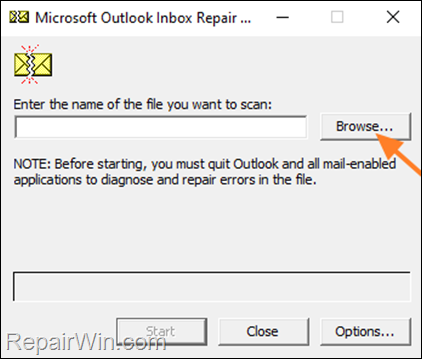
4. At Microsoft Outlook Inbox Repair tool, click Browse and select the Outlook Data File (.PST or .OST) that you want to repair.
* Notes:
1. If you 're using Outlook 365, 2021, 2019, 2016 or 2013 the default store location for the Outlook PST and the PST Data file is:
- C:\Users\%Username%\Documents\Outlook Files\username@example.pst
- C:\Users\%Username%\AppData\Local\Microsoft\Outlook\username@example.ost
2. If you 're using Outlook 2010 or 2007, the default store location for the Outlook Data files (PST or OST) is:
- C:\Users\%Username%\AppData\Local\Microsoft\Outlook\
3. If you cannot find the Outlook data files in the above locations see at the end of this article.
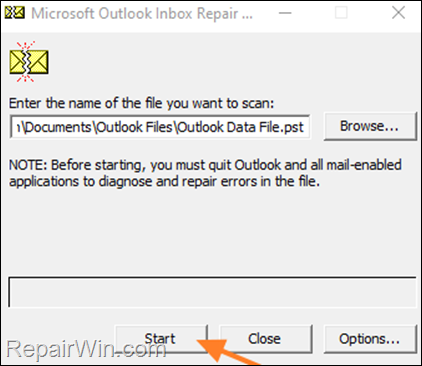
5. Finally press Start to start the repair.
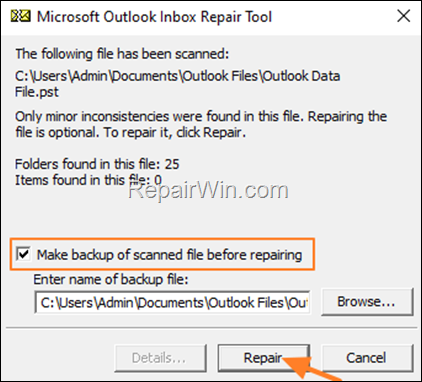
6. When prompted click Repair. *
* Note: If you don't have enough storage space to store the backup of the data file, uncheck the option Make backup of scanned file before repairing.
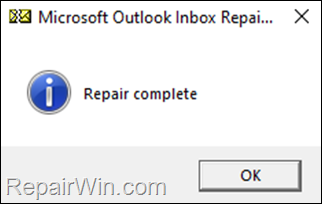
7. Wait until the Outlook data archive repair is complete, and then click OK to close the Inbox Repair Tool utility.
8. Open Outlook and check if the problem is solved.
How to locate the storage location of Outlook data files.
If you cannot find the Outlook data files in the above mentioned locations, proceed as follows:
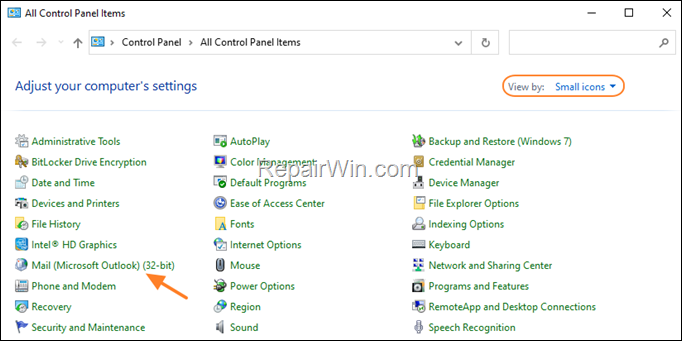
1. Navigate to Control Panel and open Mail. (If you don't see the "Mail" item, change the View By: to Small Icons)
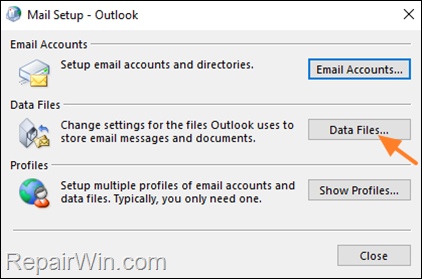
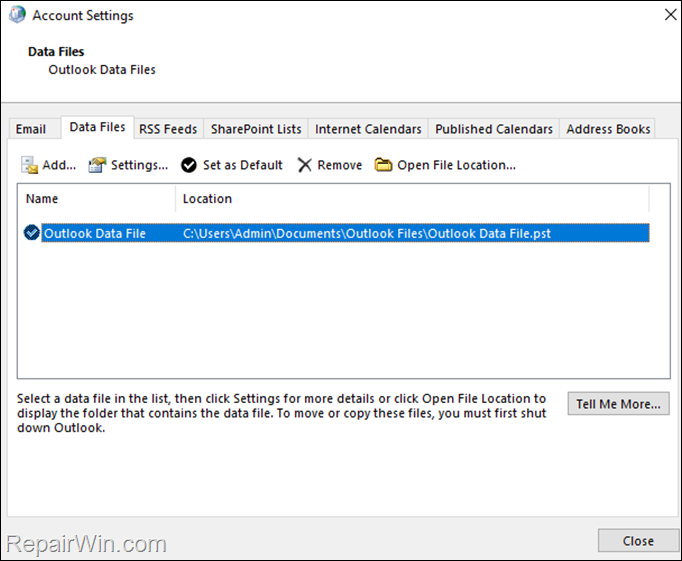
3. At 'Mail Setup – Outlook' window, click the Data Files button.
4. Note the path where the Outlook Data File (.PST or .OST) is stored on your computer, or click Open file location to navigate to the store folder.
That’s all folks! Did it work for you?
Please leave a comment in the comment section below or even better: like and share this blog post in the social networks to help spread the word about this.
- Windows failed to apply the {F312195E-3D9D-447A-A3F5-08DFFA24735E} settings in gpupdate /force command (Solved) - July 23, 2024
- FIX: PC Turns On But no Display on Screen. - July 16, 2024
- FIX: No Disk that can be used for recovering the system disk can be found in System Restore (Solved) - July 10, 2024

