How to Restore Windows 7 or Vista in a previous state
System Restore on Windows OS, is a helpful system feature, that helps users to roll back their operating system to a previous working state without affecting user's files.The System Restore feature can help you to resolve problems with your computer functionality, that may have occurred after an unsuccessful driver or software installation (e.g. a Windows update) or after a virus attack.
This guide contains instructions on how to restore your computer to a previous working state by using the System Restore feature, on Windows 7 or Vista OS.
How to Run System Restore on Windows 7 or Vista OS.
Method 1. Start System Restore from Windows Normal Mode.
In the case that you can boot into Windows, then you can run System Restore from Windows GUI: *
* Suggestion: I prefer to run System Restore, while the computer is running in “Safe Mode” (Method-2), because it is more effective than running it in “Normal Mode”.
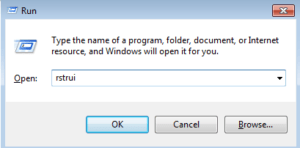
1. Press Windows ![]() + R keys to open the run command box.
+ R keys to open the run command box.
2. Type rstrui & click OK.
3. Click Next at the first screen.
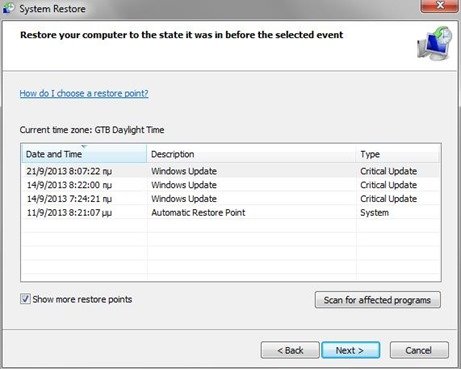
3. Choose an earlier working state (Date/Time) and click Next to start the restore process.
Method 2. Start System Restore from Windows Safe Mode.
1. First boot your computer into safe mode. To do that:
- Restart your computer and hit the “F8” key while your computer is starting up (before the appearance of Windows Logo).
- When “Advanced options” menu appears on your screen, navigate to “Safe Mode” option (using your keyboard arrow keys) option and hit Enter.
Notice: If your computer cannot boot anymore, you can always access “System Restore” feature, by booting your computer with Windows 7 installation CD and choosing the “Repair your computer” option when prompted.
2. While in Windows Safe Mode environment, you can start system restore with two easy ways:
- Method 1: Press the “Start” button and in the search box, type “System Restore” and hit “Enter”.
- Method 2: Navigate to Start > Programs > Accessories > System Tools > System Restore.
3. At “System Restore” information window, press “Next” and then choose one previous restore point to restore your computer on a previous working state.* When you choose your preferred restore point, press “Next” to confirm your selection and hit “Finish” to start the restoration process.
* Note: If you want to see all the available restore points, just check the box “Show more restore points”, under restore points date list.
After that, your computer restarts and starts the restoration process. When the restoration process is completed, your computer restarts again and boots in Windows normally. If you continue to have problems with Windows operation, you can run “System Restore” again to select a different (older) restore point to roll back.
Notice: System Restore doesn’t affect your documents and files. System Restore restores and rolls back only system files, settings and programs.
That’s all folks! Use System Restore utility anytime you face problems with your computer’s operation, without the risk to lose your work.
Did it work for you? Please leave a comment in the comment section below or even better: like and share this blog post in the social networks to help other users like you!
- Windows failed to apply the {F312195E-3D9D-447A-A3F5-08DFFA24735E} settings in gpupdate /force command (Solved) - July 23, 2024
- FIX: PC Turns On But no Display on Screen. - July 16, 2024
- FIX: No Disk that can be used for recovering the system disk can be found in System Restore (Solved) - July 10, 2024


