How to Resolve the Top 5 Frustrating Issues in Windows 11.
Switching to a new operating system can be a daunting task. Windows 11, with its sleek and modern design, offers enhanced security features but also introduces significant design changes that can disrupt your usual workflow.
If you've recently upgraded and are struggling with the new interface, you're not alone. Many users are encountering similar challenges. This comprehensive guide breaks down the five most frustrating issues in Windows 11 and provides detailed, step-by-step instructions to resolve them efficiently.
1. How to Move the Start Menu Back to the Left Corner
The centered Start menu is one of the most noticeable changes in Windows 11. For users accustomed to accessing the Start menu from the bottom-left corner, this can be disorienting. Fortunately, you can restore it to its classic position with a few simple steps.
The Fix:
- Right-click any empty space on your taskbar and select Taskbar settings. This action opens the Taskbar settings panel, allowing you to customize the position and behavior of your taskbar.
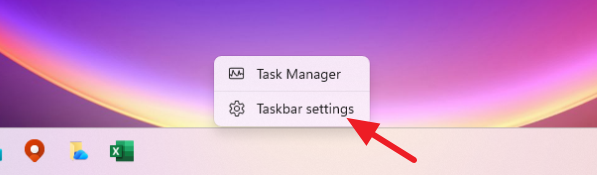
2. In the Settings menu that appears, scroll down and click on the Taskbar behaviors dropdown. This section allows you to modify how the taskbar behaves, including its alignment.
3. Click the dropdown menu next to Taskbar alignment and change it from Center to Left. This adjustment will immediately move your Start button and pinned icons to the left side, restoring the familiar layout.
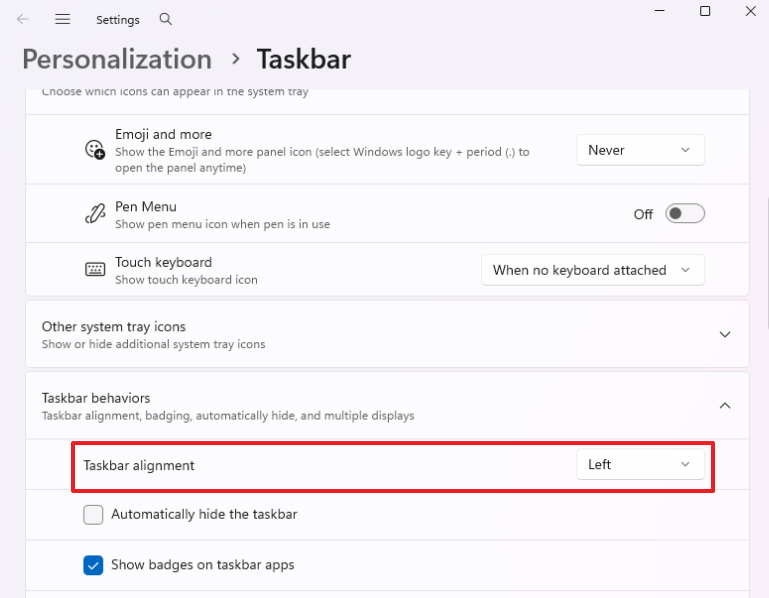
Your Start button and pinned application icons will instantly snap back to their traditional, familiar home on the left side of your desktop.
2. Why Windows 11 Runs Slow (and How to Speed It Up)
Windows 11 can sometimes slow down due to background apps consuming system resources. By managing these apps, you can free up RAM and significantly enhance performance.
The Fix:
Improve your computer’s performance by managing startup applications:
- Press the Windows + I keys on your keyboard to open Settings. This command opens the main settings interface, where you can configure various system parameters.
- Select Apps from the left-hand sidebar, then click on Startup at the bottom of the list. This section lists all applications that are configured to launch at startup.
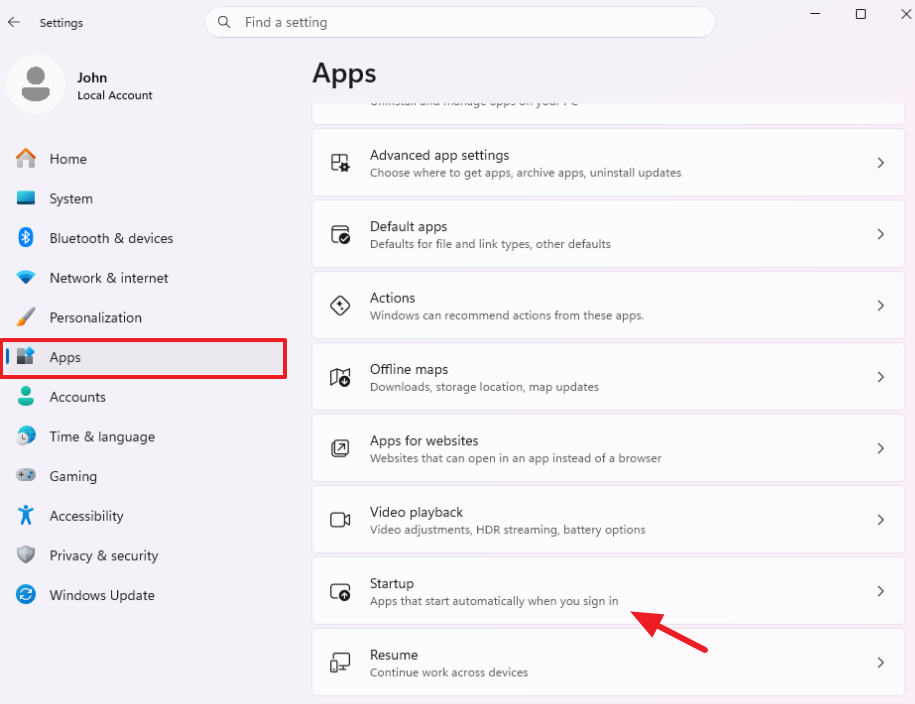
3. Review the applications authorized to launch when your PC boots up. Evaluating these can help you identify unnecessary programs that may be slowing down your system.
4. Toggle Off any apps you don’t need running in the background, such as Spotify, Microsoft Teams, or Copilot. Disabling these apps prevents them from consuming memory and processing power until you manually start them.
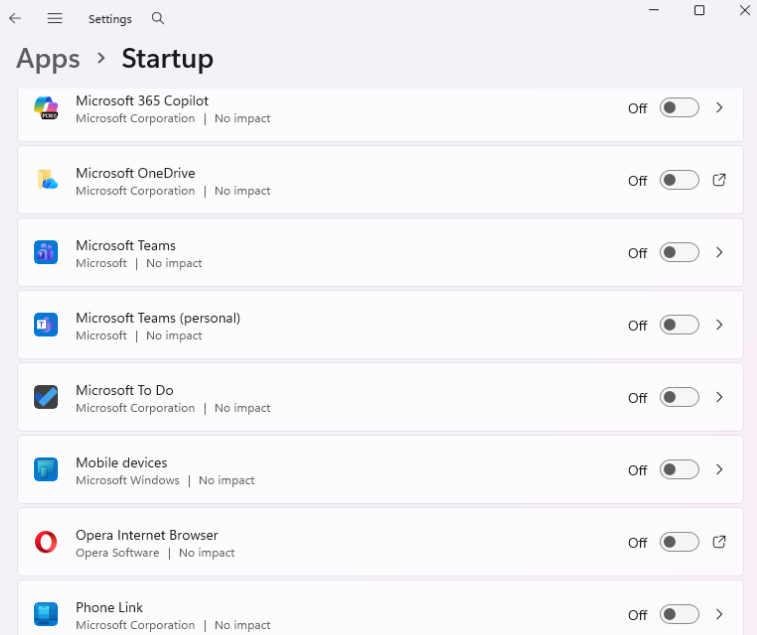
Note: Disabling an app here won't break it; it simply prevents the software from consuming background memory until you manually open it.
3. How to Restore the Classic Right-Click Context Menu
Microsoft's redesign of the right-click context menu in Windows 11 aimed to reduce desktop clutter but resulted in some commands being hidden behind an additional click. You can bypass this limitation and restore the classic context menu with a quick registry modification.
The Fix:
- Press the Windows + X keys on your keyboard and select Terminal (Admin) from the power menu. This opens a command-line interface with administrative privileges, allowing you to execute system-level commands.
- Copy and paste the following exact command line directly into the window and press Enter:
reg add "HKCU\Software\Classes\CLSID\{86ca1aa0-34aa-4e8b-a509-50c905bae2a2}\InprocServer32" /f /ve
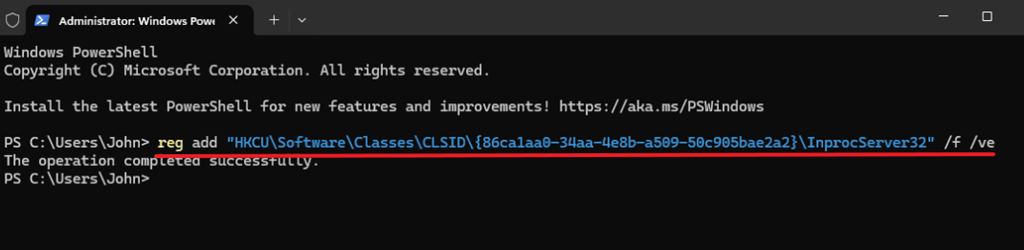
- Close the window and restart your computer. When your computer reboots, the traditional, right-click menu will be fully restored, providing immediate access to all commands without additional clicks.
Note: To undo the change, issue the below command in Terminal (Admin):
reg delete "HKCU\Software\Classes\CLSID\{86ca1aa0-34aa-4e8b-a509-50c905bae2a2}" /f
4. How to Reclaim 20+ GB of Storage Space After the Upgrade
After upgrading, Windows creates a Windows.old folder on your primary drive, which can consume significant storage space. If your system is stable and you don't need to revert to the previous version, you can safely delete this folder to free up space.
The Fix:
- Press the Windows + I keys on your keyboard to open Settings. This command provides access to system settings, including storage management.
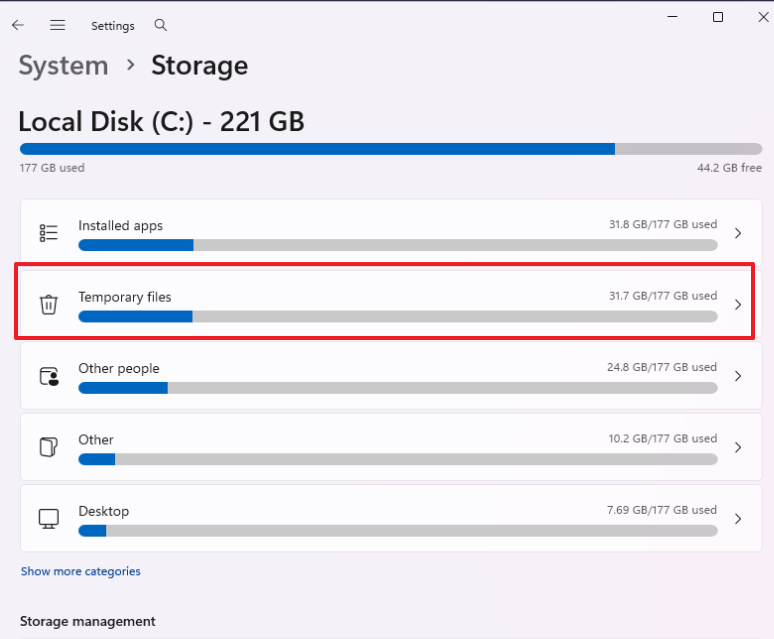
- Select System from the left-hand sidebar, then click on Storage. This section displays a breakdown of your storage usage and options to manage it.
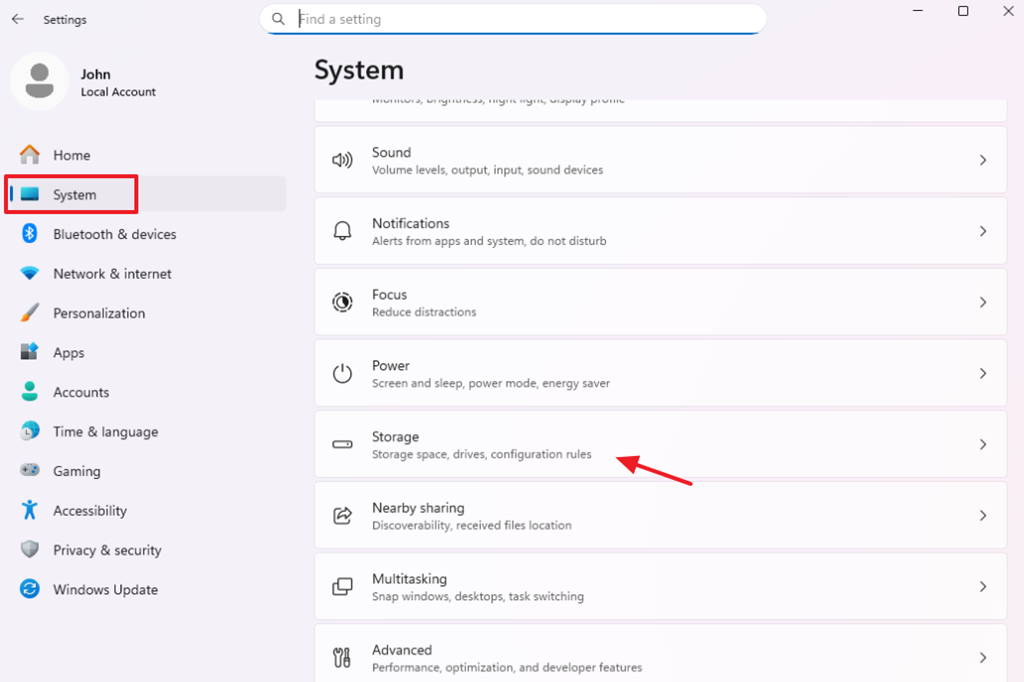
3. Wait a few moments for the system to scan your drive and click on Temporary files. This option allows you to review and delete unnecessary files, including previous installations.
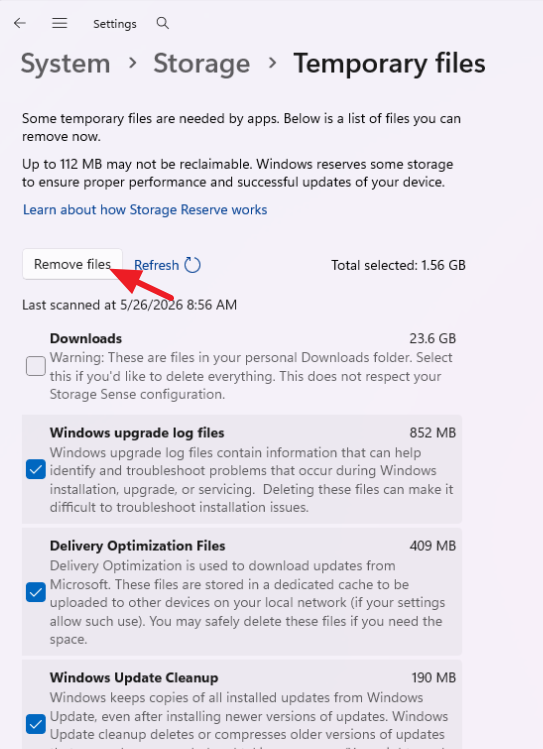
4. Look through the list and check the boxes next to:
- Previous Windows installation(s)
- Windows Upgrade log files
- Delivery Optimization Files
- Window Update Cleanup
- Temporary files
5. When done, click the Remove files button at the top of the menu to permanently purge the data. This action will free up valuable storage space on your drive.
5. What to Do When Your Wi-Fi Keeps Dropping or Not Connecting
If your internet connection is unstable or your computer struggles to connect to Wi-Fi networks, resetting your network settings can often resolve these issues by reinstalling network adapters and resetting network configurations.
The Fix:
- Press the Windows + I keys on your keyboard to open Settings. This shortcut brings up the settings interface, where you can access network options.
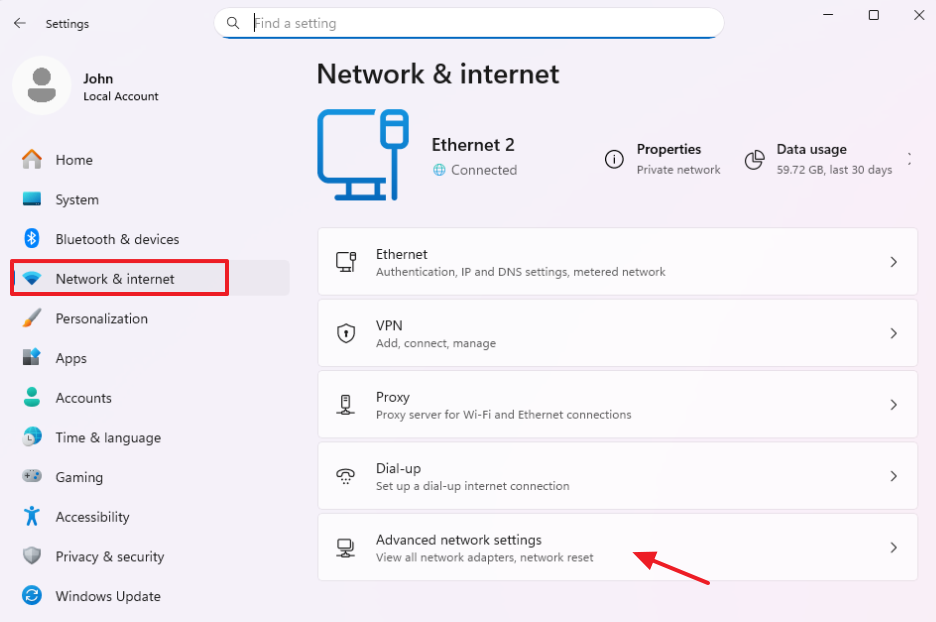
- Select Network & internet in the left sidebar and then select Advanced network settings. This section provides advanced options for managing your network connections.
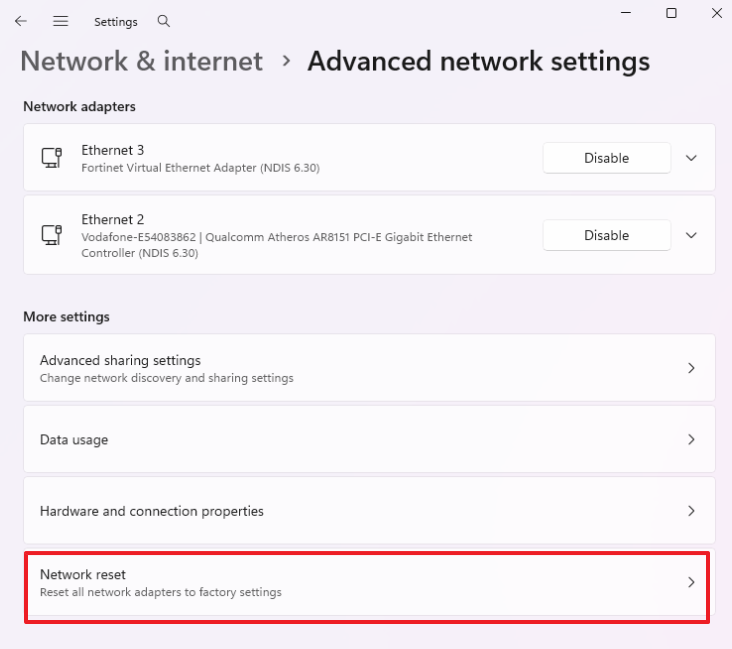
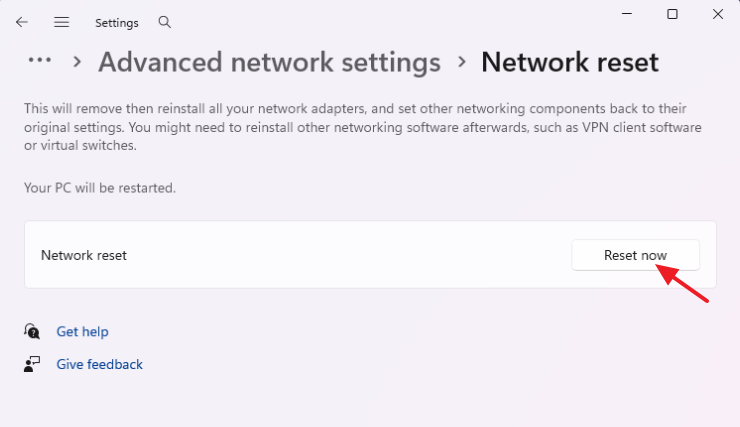
3. Under the More settings subsection, click on Network reset. This option will allow you to reset your network settings to their default state.
4. Click the Reset now button and then choose Yes to reset your network settings. This process will remove and reinstall all network adapters and reset other networking components to their default values.
Warning: A network reset removes and reinstalls all of your network adapters and sets other networking components back to their default values. Your computer will automatically restart after five minutes, and you will need to re-enter your Wi-Fi passwords.
Additional Tips
Beyond these steps, consider the following additional solutions:
Optimize Windows Update Settings
Ensure that your Windows Update settings are optimized to prevent unnecessary background activity that can slow down your system. Navigate to Settings > Update & Security > Windows Update > Advanced Options and adjust settings to limit background downloads.
Adjust Visual Effects for Performance
Windows 11's visual effects can be resource-intensive. To adjust these settings, go to Control Panel > System > Advanced system settings, click on Settings under the Performance section, and choose Adjust for best performance. This change will reduce the visual effects to improve system speed.
Summary
Windows 11 offers a range of new features and improvements, but it can also present challenges for users accustomed to older versions. By following the steps outlined in this guide, you can customize the Start menu, improve system performance, restore classic context menus, reclaim storage space, and stabilize your Wi-Fi connection. These solutions will help you optimize your Windows 11 experience and maintain a smooth and efficient workflow.
Frequently Asked Questions
How do I move the Start Menu back to the left corner in Windows 11?
To move the Start Menu back to the left, right-click on the taskbar and select Taskbar settings. Scroll down to Taskbar behaviors in the settings panel, then change Taskbar alignment from Center to Left. Your Start button and pinned icons will move to the left side immediately.
Why does Windows 11 run slow and how can I speed it up?
Windows 11 may slow down due to background apps consuming resources. To speed it up, press Windows + I to open Settings, go to Apps, then Startup. Toggle off unnecessary startup apps like Spotify or Microsoft Teams to prevent them from running in the background and consuming resources.
How can I restore the classic right-click context menu in Windows 11?
To restore the classic context menu, press Windows + X and select Terminal (Admin). Enter the command: reg add "HKCU\Software\Classes\CLSID\{86ca1aa0-34aa-4e8b-a509-50c905bae2a2}\InprocServer32" /f /ve. Close the terminal and restart your computer. The traditional context menu will be restored.