
FIX: Cannot Install XPS Viewer in Windows 10 (Solved)
In a previous tutorial I mentioned the steps required to install XPS Viewer on Windows 10. But, some users complaining that they cannot install XPS Viewer, because the XPS viewer is not listed after pressing the 'Add a feature' button (Apps > Manage optional features > Add a feature), or cannot be installed.
This tutorial contains instructions on how to troubleshoot XPS viewer installation problems in Windows 10 1803 & 1809 versions.
How to Resolve XPS Viewer installation problems in Windows 10.
Method 1. Uninstall and Reinstall Microsoft XPS Document Writer.
1. Open Programs and Features and then click Turn Windows features on or off.
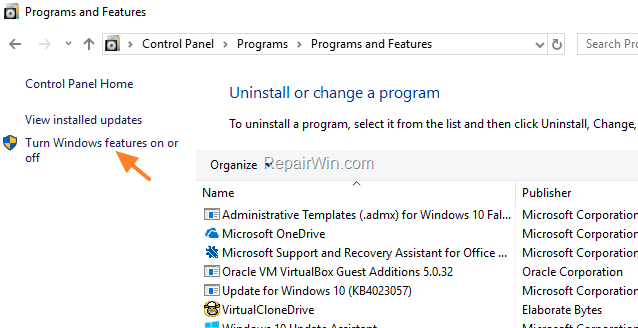
2. Uncheck the Microsoft XPS Document Writer box and hit OK.

3. Now click the Turn Windows features on or off again and check the Microsoft XPS Document Writer box and click OK.
4. Restart your PC.
5. Try to install the XPS Viewer.
Method 2. Install XPS Viewer by using the DISM command.
1. Open Command Prompt as Administrator.
2. In command prompt, give the following command and press Enter.
- dism /Online /Add-Capability /CapabilityName:XPS.Viewer~~~~0.0.1.0

Method 3. Download XPS Viewer from Windows Update instead of WSUS. (Windows 10 Pro & Enterprise).
If you 're using Windows 10 Pro or Enterprise, then apply the following steps in Group Policy Editor. *
* Note: If the computer belongs to a Domain, you need to modify the domain group policy settings (GPO) and then to run the "gpupdate /force" command, before installing XPS Viewer.
1. Open Group Policy Editor. To do that:
1. Press simultaneously the Windows
+ R keys to open the run command box.
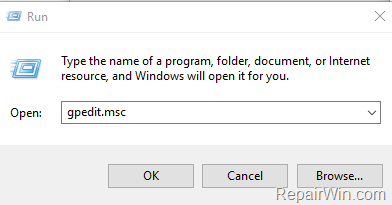
2. Type gpedit.msc & Press Enter.

2. At the left pane navigate to:
- Computer Configuration -> Administrative Templates -> System
3. At the right pane double click at Specify settings for optional component installation and component repair
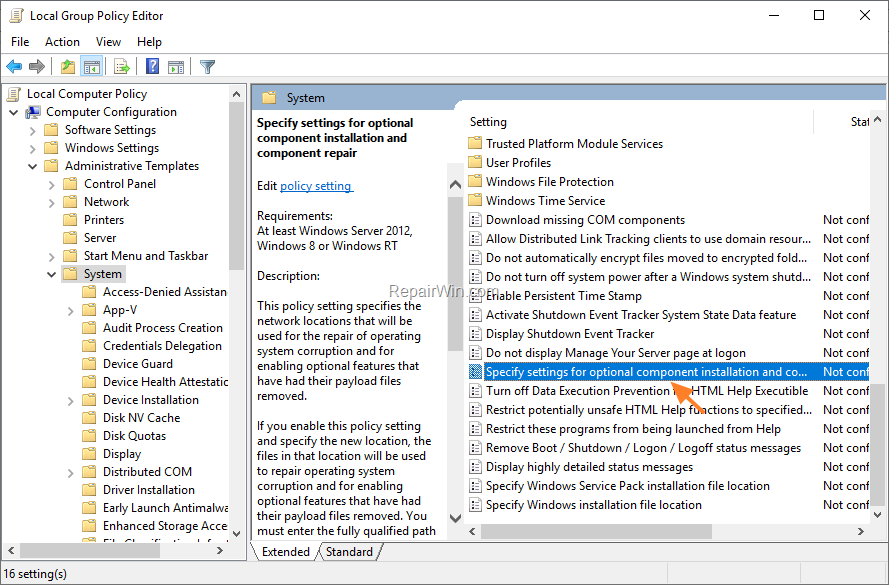
4. Set the policy to Enabled and then check the Download repair content and optional features directly from Windows Update instead of Windows Server Update Services (WSUS) box.
5. When done, click Apply and OK and restart your PC.

6. After restart, try to install the XPS Viewer by using the DISM method above.
7. After XPS viewer installation, open Group Policy Editor and revert back the changes.
That’s all folks! Did it work for you?
Please leave a comment in the comment section below or even better: like and share this blog post in the social networks to help spread the word about this solution.
Frequently Asked Questions
What should I do if the XPS Viewer isn't listed in 'Add a Feature' on Windows 10?
If the XPS Viewer isn't listed, try uninstalling and reinstalling Microsoft XPS Document Writer through 'Turn Windows features on or off'. If this doesn't work, use the DISM command to install the XPS Viewer.
How do I uninstall and reinstall Microsoft XPS Document Writer?
Open 'Programs and Features', click 'Turn Windows features on or off', uncheck 'Microsoft XPS Document Writer', and click OK. Then, check the same box again and restart your PC. Try installing the XPS Viewer afterward.
How can I install XPS Viewer using the DISM command on Windows 10?
Open Command Prompt as Administrator and enter the command: dism /Online /Add-Capability /CapabilityName:XPS.Viewer~~~~0.0.1.0 to install XPS Viewer.
What steps should I follow to download XPS Viewer from Windows Update on Windows 10 Pro and Enterprise?
Use the Group Policy Editor to enable 'Download repair content and optional features directly from Windows Update instead of WSUS'. After applying, restart your PC and use the DISM method to install XPS Viewer. Revert the Group Policy changes once installation is complete.




December 17, 2019 @ 4:13 pm
Thank you!
January 2, 2020 @ 7:45 pm
After following instructions in Method 3, I still get :error: 0x8024002e" when I run the DSM command.
January 3, 2020 @ 1:24 pm
Have you tried to install XPS with DISM without modifying the Group Policy?
May 4, 2020 @ 9:00 pm
You Fixed my Problem with Method#2 since #1 Didn't work for me. Thanks for a Job Well Done!
June 1, 2020 @ 4:17 pm
You Fixed my Problem with Method#2 also!!!!!!. Thanks for the assist!
July 11, 2020 @ 8:29 am
Thank you! First method is not fixed my problem but second method worked. Thanks again.
September 12, 2020 @ 11:07 pm
It worked : Method #3
Thank you
October 27, 2020 @ 2:31 pm
GPO and DSIM fixed for me, thanks!
May 11, 2021 @ 12:26 pm
Thank you! The first method is not fixed my problem but the second method worked.
June 7, 2021 @ 8:03 pm
Hi .. Thanks very much for your help .. Only Method 4 works for me…
August 2, 2021 @ 7:32 am
Fixed on 3rd attempt. I should have looked at your screen shots (and included the spaces on the command prompt that you showed) and I would have got it right first time
Excellent information.
June 14, 2023 @ 10:22 am
Method 3 worked for me, thank you too much